Thursday, January 18, 2018

Getting started with Snips and HomeAssistant: Part 1

So I have been using Snips to add voice controls to my Home Assistant setup. I just want to document some of the most frequent questions I get and give people some guidance.

Why use Snips instead of Alexa or Google Home? Because I really don't want a huge company recording everything I say.

Setting up Home Assistant is a whole topic in itself, but is not actually required to use snips. In a later post I'll give some example Python code you can use to set up your own voice responses.

Snips is in pretty fast development so this will probably get outdated soon enough, but will hopefully still have good information for people.

Installing Snips

Snips has their own documentation here so if you run into issues go back to their docs.

My installs are on Raspberry Pi 3 running Raspbian. I have been mucking with Linux for a long time so I prefer to have my own OS and such I can tinker with so I won't detail the docker installation.

The actual installation instructions are here: https://github.com/snipsco/snips-platform-documentation/wiki/1.-Setup-the-Snips-Voice-Platform

Hardware

I have two setups

That Jabra is a lot more expensive than when I bought it, get the Respeaker since it also give you pretty lights you can use to show when Snips is listening. Downside, is you need speakers to get sound output then, but that's a good thing since you can then use your Raspberry to play music too.

Sound Setup

The Snips software can simply use your alsa settings. Jabra is pretty straight forward, just plug it in and copy this to your asound.conf

Jabra /etc/asound.conf

pcm.!default {
  type asym
  playback.pcm {
    type plug
    slave {
      pcm "hw:0,0"
      rate 48000
      format "S16_LE"
      channels 2
    }
  }
  capture.pcm {
    type plug
    slave.pcm "hw:1,0"
  }
}

ctl.!default {
  type hw
  card 1
}


Respeaker 4 Mic Hat

This install is a little more complicated, from their oficial installation instructions here: https://github.com/SeeedDocument/ReSpeaker-4-Mic-Array-for-Raspberry-Pi/blob/master/ReSpeaker-4-Mic-Array-for-Raspberry-Pi.md

Get the seeed voice card source code.
# as your pi user on your raspberry
mkdir /home/pi/WORK
git clone https://github.com/respeaker/seeed-voicecard.git
cd seeed-voicecard
sudo ./install.sh 4mic
reboot
Then select the headphone jack on Raspberry Pi for audio output:
sudo raspi-config
# Select 7 Advanced Options
# Select A4 Audio
# Select 1 Force 3.5mm ('headphone') jack
# Select Finish
Check that the sound card name looks like this:
pi@raspberrypi:~/seeed-voicecard $ arecord -L
null
    Discard all samples (playback) or generate zero samples (capture)
playback
capture
dmixed
array
ac108
default:CARD=seeed4micvoicec
    seeed-4mic-voicecard,
    Default Audio Device
sysdefault:CARD=seeed4micvoicec
    seeed-4mic-voicecard,
    Default Audio Device
dmix:CARD=seeed4micvoicec,DEV=0
    seeed-4mic-voicecard,
    Direct sample mixing device
dsnoop:CARD=seeed4micvoicec,DEV=0
    seeed-4mic-voicecard,
    Direct sample snooping device
hw:CARD=seeed4micvoicec,DEV=0
    seeed-4mic-voicecard,
    Direct hardware device without any conversions
plughw:CARD=seeed4micvoicec,DEV=0
    seeed-4mic-voicecard,
    Hardware device with all software conversions

Respeaker 4 Mic Hat /etc/asound.conf

pcm.!default {
    type asym
    playback.pcm "playback"
    capture.pcm "ac108"
}

pcm.playback {
    type plug
    slave.pcm "hw:0,0"
}


pcm.dmixed {
    type dmix
    slave.pcm "hw:0,0"
    ipc_key 555555
}


pcm.ac108 {
        type ac108
        slavepcm "hw:1,0"
        channels 4
}


Setting up the pretty lights

Here are the instructions for setting up the pretty led lights. In a later part we will detail how to how this go on automatically when Snips is listening.


cd /home/pi/WORK
git clone https://github.com/respeaker/4mics_hat.git
cd /home/pi/WORK/4mics_hat
sudo apt install python-virtualenv          # install python virtualenv tool
virtualenv --system-site-packages ~/env     # create a virtual python environment
source ~/env/bin/activate                   # activate the virtual environment
pip install spidev gpiozero           # install spidev and gpiozero
python pixels.py
You should see pretty lights flashing on the respeaker

Testing Sound

With the Jabra you will get sound from the speaker, for the Respeaker you need to plug in external speakers.


arecord test.wav

aplay test.wav

You should hear whatever you recorded. If that works you can now start with configuring Snips in Part 2

Sunday, December 10, 2017

Keurig WiFi Coffee Machine


So we all want a wifi enabled coffee machine, and there are some promising things on the horizon (spinn looks cool https://www.spinn.com/coffee-maker but $300 is a lot to spend, right?)

I looked at taking apart the keurig so I could do this as seamlessly as possible, but the keurig is a complete pain to disassemble, plus the possibility of destroying it made me stop pretty quickly. So why not just read leds and push buttons.

So this consists of Snips on a Rasp Pi3 doing voice stuff, talking to HomeAssistant to send an MQTT message to a NodeMcu WiFi Microcontroller with a solenoid to press the power button. There are 3 light dependent resistors to read power, heat and water empty leds and feed that back. The other two leds are auto off (amateurs, amiright?) and descale which I didn't think were critical.

It just sits on top so I can take it off if I need to, etc. It still needs solenoids for actually brewing the coffee, but I wanted to make sure the solenoid I got could produce enough force before I bought more.

So now that it works, i need to mount it on an actual pcb and add the extra solenoids and come up with a cover for the whole shebang (all the parts will live on top), since the WAF (Wife Acceptance Factor) is fairly low as it is. The nice thing is that you can still press the backside of the solenoids and access the buttons (like they did in the dark ages), so could conceivably be made pretty transparent.

Now I just need that robot arm to load the cups and put my mug in place. Maybe a cup warmer, so if I hit snooze it doesn't get cold? Maybe some sort of death clock? Bonus geek points if you get that reference.

Sunday, May 29, 2016

New Bimini for the boat

So it looks like rain for our trip so I added a bimini top, got it from Amazon for $104 shipped. Had to cut it down quite a bit, it was 46", cut it down to about 33 to fit under the boom so I could use it while sailing. 

Oh, and I finally cleaned the top sides! 

Link to the bimini (associate link): Amazon.com: Best Choice Products SKY1161 6' 600D UV Waterproof Top 3 Bow Bimini Boat Cover with Storage Case: Automotive


Thursday, May 19, 2016

Restoring the front hatch on my Spirit 23

The front hatch on our boats is a strong plastic of some variety, not acrylic or lexan. I was lucky in that my front hatch was not badly damaged, just some cracks along the back edge, but a ton of crazing. It was actually pretty solid since i did manage to step on it a few times.


 So I figured it couldn't hurt to try to pretty it up now that the windows look so good!

You can follow my thread on sailnet for more post although I will try to put them here as well now: Spirit 23 in Charlotte, NC

I epoxied the cracks in the back and then brushed the whole top of it with a couple layers of thinned epoxy to fill the cracks and crazing in it. Then covered it with about 10 coats of a semi gloss spar varnish.


The second image is just to show that it is still translucent, never be clear with all the crazing and such.

Overall really happy with it and I think it should hold up pretty well. I will probably make a cover for it for when it is stored just to keep the varnish fresh. Time will tell how it holds up.

Thursday, June 6, 2013

Got a nice sail in on the new boat, some sailing but a fair bit of motoring on the way back too. Nothing exciting which after some of sails is just right! Ignore the dirty sails...


Thursday, August 9, 2012

Sailing Lake Norman

Nothing too exciting, but I finally got the boat out for some sailing again, been quite a while! I've been doing a lot of mountain bike racing as well as playing on the powerboat. It's too bad because we have had good winds down here lately.


Going out was a straight shot downwind, then a couple lazy reaches across the bigger part of the bay. Coming in was a fair bit of tacking and I wasn't in a hurry but not super impressed with my tacking angles but really not too bad. All in all a nice relaxing day, except for a stowaway that decided to scamper across my foot partway out. A nice size wolf spider has been living down by the keel apparently. Hopefully he has moved on, really do not want to meet him again.

Wednesday, November 23, 2011

Shrink a Windows 7 Volume below Half

OK, time out from sailing for some tech talk. I could not find this solution anywhere so I thought I would post something telling how to shrink a volume in Windows 7. There are lots of answers out there that all involve spending money on 3rd party tools. But there is a fairly simple way to do it.

The issue is that Windows/NTFS stores an MFT file halfway along the drive which is an unmovable system file, which means not matter how little data you have on a drive you can't shrink past just over halfway since that file is started just past the halfway point on the volume.

This came up when I tried to restore a backup that used only 300GB of space or so onto a 640GB volume. You'd think that would work right? Well unfortunately Microsoft in all its brilliance decided that since the original backup came from a 1280GB volume, it couldn't be done. This will give an error about 'no suitable disk for restore found'.

The answer is to shrink the volume and then perform another backup with the smaller volume size which will then fit onto a smaller drive. Follow these basic steps to do that.

1. Defragment the drive. Always required. You can try using the windows utilities which should do the job. There is also a free alternative which actually uses a microsoft utility that will do a very thorough job as well. Power Defragmenter.
2. You may need to also move some system files around. You can follow steps from here. Howtogeek.com - working-around-windows-vistas-shrink-volume-inadequacy-problems
3. Create a system repair disk. Control Panel->Backup and Restore->Create a System Repair Disk.
4. Boot using that disk.
5. When it starts, cancel the restore process, and start a Windows Command Prompt.
6. Run diskpart
      list volumes
      select volume 2 # Choose the volume that corresponds to the drive you are trying to shrink.
      shrink querymax # This will tell you how much it can shrink
      shrink # Defaults to shrinking to the maximum amount.

That should be it. If you still can't shrink the disk, try doing it in Windows using Computer Management->Disk Manager. When it fails there, it will log an error in the event log telling you which file is involved, and you should be able to move that using one of the steps in step 2 above.

OK, back to sailing. Or maybe riding my bike.

Tuesday, November 22, 2011

Lake Murray, SC

A couple weeks back I headed out for another weekend of sailing and camping. I had originally planned to head back to Lake Marion again, but got a late start so halfway there I decided to try Lake Murray, which is just west of Columbia, SC. Lake Murray turned out to be a great lake for sailing, The weather was pretty heavy that first day with avg 15 knot winds with only a few gusts coming in but those that did were pretty heavy.

A fair bit of heeling even with just the main up
The whole day ended up being a close reach which I actually enjoyed quite a bit. Beam reaches are just too easy! I had the rail close to the water most of the day since my main sail is very full which works well in light air, but ends up causing a lot of heel. I started to put in reef points but haven't set the grommets yet. At one point after I had rolled out the genoa (I'm not much for caution), a good gust caught me which put the coaming all the way in the water and made me take on about ten gallons of water! Which pointed out the need to enlarge the cockpit drains. And got my feet wet. Fortunately my beer didn't spill so disaster averted. I also wanted to practice heaving to and learned that my boat will heave to quite nicely in strong winds which was good to know. I spent a fair bit of time looking for a good place to camp and finally found a quiet cove that already had a fire pit and settled in for the night.
The following morning was quite pretty and after a couple cups of coffee and some oatmeal I was ready to go. Unfortunately, the wind was not ready to cooperate.
What took about 3 1/2 hours to get out to, ended up taking the better part of almost 12 hours to get back. The wind had died overnight for the most part and shifted so I was back on a close reach which is no fun in light shifting winds. Only had a small trolling motor but worse I hadn't put back in the larger batteries so I was stuck trying to gather what wind I could and paddling to get somewhere. Ugh. You can see in the track below the straight line out and the much less fun track back. And the glassy conditions at times on the lake in the picture above. Ah well, it was still nice to get out and learned a few more tricks and made it back so all in all a good weekend.

Wednesday, November 9, 2011

Companionway Updates

I got some new bits on the boat today. The hatch on the Newport 16 is basically just a cover that sits on top, nothing to hold it down. So I got a couple of Sea Dog hatch hinges that have a removable pin in case I do want or need to take it off. I also got a twist type hatch adjuster to hold it open which will make it a lot easier to grab things from down below without climbing all the way in. At 6'3" the cabin is awfully tight so I like to just lean in. But then I don't quite clear the hatch with my back if I put a knee on the companionway sill, I had to move very slow and it was quite a pain.


You can also just see the new drop board bits I built which I'll get pics of later.

Tuesday, October 4, 2011

Sailing on Lake Marion - Day 2

Day two started with a beautiful sunrise. I made some coffee with the JetBoil french press and got going. Still no rudder but the wind had shifted a little and lightened up some so it wasn't hard to get out and get going. Mainly steering by my position on the boat occasionally hanging over the side to get it to turn windward. Without a rudder I had a lot of lee helm which was a hassle. After a nice long close hauled reach trying to steer through the stumps to the deeper water on the other side I got into a weird situation where I could not get the boat pointed. I finally rolled up the genoa and that helped balance things out although I did lose some speed. After a couple wasted tacks going nowhere, I got it settled into a nice groove and managed to get a couple good long tacks and then got a nice wind shift headed back to get up to the bridge.
The one long tack from Vance back across the lake looked like this and was the best part of the day. Note the lack of a tiller. I just sat with my back on the cabin occasionally leaning a little left or right to adjust my heading. The engine there became just for show since it wouldn't run after a bit, just started leaking gas. I was guessing that the float in the carb got stuck or some such. I am definitely going back to the trolling motor because it has been nothing but trouble.
I was ghosting my way under the bridge close hauled and just about through the second span when a gust of wind came up and grabbed the front of the boat, smashing the bow. Yay. Got a pretty good bit of damage to a spot that had already been repaired once prior to me, so now I get to repair it again for real. Slightly ironic in that I have a rub rail I am working on that will look nice ad would have been great protection for that but oh well. On the other side of the bridge the winds got flukey which are a real pain to deal with when you are steering by jumping around the boat. I did get a good wind for a while but I started figuring that it was going to be tight making it to the landing by dark and if the wind died I wasn;t going to make it. So I bailed out at a boat ramp with a nice beach next to it. Tied the boat off and got to enjoy a nice 8 mile run back to my car. Well I probably ran about 6 of it and walked 2, took me about an hour and 15 minutes or so. Well I did want to get some exercise this weekend.

All in all, it was quite an adventure. What is it they say, "It's not an adventure until something goes wrong." I was happy that despite all the setbacks the boat did get me back home in one piece and I learned quite a bit about the boat and how to sail it. I'd actually sail Lake Marion again. It was a nice wide lake, the camping was beautiful and there were plenty of spots to camp. The cypress trees are vary nice. I'd launch closer to 95 to avoid the hairy sections and try to generally stick to the south side where the main channel is (the blue line in the google earth pic above) to avoid the hazards.

The rest of my pictures are up on picasaweb at https://picasaweb.google.com/110586701752725030552/LakeMarion

Sailing on Lake Marion - Day 1

So I decided I would head down to Lake Marion in SC this weekend just to sail somewhere different. My local lake, Lake Norman is relatively narrow so the winds can be flukey. Plus I figured I would make a weekend of it and camp out on an island somewhere. Turned into quite the adventure, but I learned a lot about my boat and gained a few new skills. Plus any trip where you wake up to this view can't be all bad, right?
So here is a view of the google earth track. Navionics is a great little application (Lakes East is what I have), but I have heard the new version is not as good.
   There was a lot of wind, white caps on the lake, but overall not too bad. Probably should not have chosen to launch on the lee shore at a place called Stump Hole Landing though! It lived up to its name with a lot of stumps and in fact the whole lake has good stretches of stumps as well as cypress trees popping up. There was one lonely little tree right out in the middle of the lake. Considered changing my plans to come from the north side of the lake which would have made more sense. But I got out, had a great downwind run making over 4 knots with just the genoa out (the roller furler worked well although I need a longer reefing line!).
  I made it under 95 and got greedy and tried to hoist the mainsail. Well the new tiller tamer had been working great except that my tiller moves up and down so when I am not holding it it basically falls down and locks the tiller. So when I moved forward and was pulling the main up a good gust of wind came up, pushed the boat out of the wind and caught the sail. When the boat heeled over, I heard the crack of the rudder. The wind was pushing me hard into the shore for a while until I got things situated.
  So I got to to learn how to sail for the next 7 miles by playing with sail trim. I was losing light since I got a late start playing with things around the house, so I decided to hit a nice harbor I saw on the charts and just managed to glide up to a great little island and get everything on the shore and my tent set up in the last bit of light. I had a nice little spot and the Newport floated out in about 8 inches of water. Great sandy spot for my tent, sheltered from the wind and I slept like a baby, except at one point when my forearms got tight (from holding the sheets for two hours steering along) and I woke up with my hand asleep.

But again, got a perfect spot to camp and had a great night.

New Gear Winch, Mainsheet Routing, Tiller Tamer and the death of a Rudder

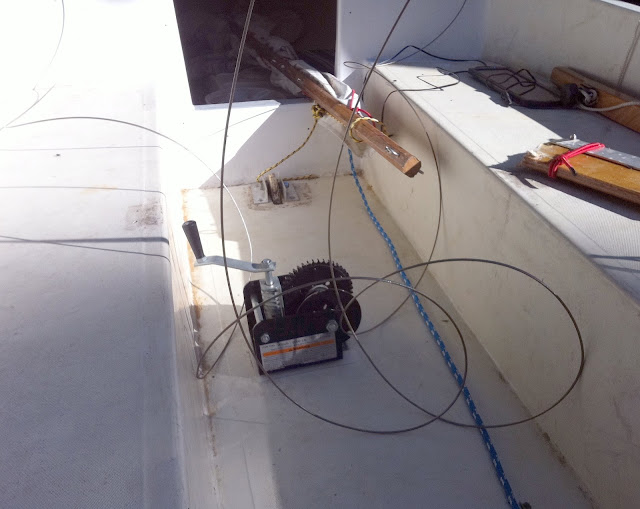
So I installed a new gear winch for the swing keel, which works well. The only drawback at this point is that it takes too many turns to lift. I will end up wrapping 'something' around the cable drum to increase the diameter which will reduce the number of turns. I may also get real crazy and install some type of electric motor to drive it which would be a nice bonus. Getting rid of the thwart really opens up the cockpit. And it also works well as a drink holder!


Here you can see where I ran the mainsheet and now run it to the end of the boom. Not entirely happy with it but I wanted to go out this weekend and wanted to get it working. Basically cleat it under the tiller. Please disregard how dirty the cockpit is, still need to clean and paint it.


I also managed to put together a tiller tamer out of part of an old broken desk chair that I saved the wheel adjuster for. I tend to look at something like that and say 'that could be good for something' and in this case it paid off.

However, stay tuned for the next bit where the tiller tamer combined with some good wind gusts and a little bit of stupidity led to this, the remains of my rudder:

Thursday, September 22, 2011

I wanted to post some pics of a new DIY roller furling setup. I got a lot of ideas from a post on the web that I can't seem to locate now. It's built out of mostly 1/2 inch sch 40 electrical conduit. I used conduit since it is made to be UV resistant as opposed to white PVC pipe. The T had to be gotten from the plumbing section as well as the two parts of the drum. About 25 bucks for the whole thing.

Here is the drum. This is the only part I glued together and even that doesn't absolutely need it. From the bottom it consists of a 1/2 inch cap, small bit of 1/2 pipe to connect, 1/2 male threaded piece, PVC box cap (from electrical dept.) 1/2 inch thread to 1 1/4 adapter, small bit of 1 1/4 to connect it to the next adapter, plate and male adapter, then the 1/2 inch pipe starts.


You can see where the 1/2 pipe starts I actually drilled and chamfered a small stainless (#6 x 1/2) screw rather than gluing. I had done this same design but glued all the pieces together but ended up breaking bits on it while moving the mast around and such. Using a screw does two things; allows me to take it apart and replace bits if needed and makes it slightly more flexible which will hopefully put a little less stress on things and I won't break it! We'll see how it holds up. If it all goes to heck, I can still take the jib off and hank it back on but it has held up rolling things up in about 25mph winds.

Here is the next bit. Basically cut pieces of PVC long enough to go in between the hanks, then cut out a bit of the coupling and pipe about halfway around to give room to get the hank on the fore stay. Then I put a screw in the backside of the coupling (could also be glued). Do this for each hank of course.


And here is the top bit, pretty self explanatory. Using eyebolts with washers, then zip tying the jib top and bottom. The whole thing just spins on the caps on either end, tension on the sail is preset by the zip ties and the pvc pipe between the hanks so you want to get it fairly tight. I also sized it so the caps roll on the swaged ends and not on the stay itself, it will roll smoother and less chance of damaging the stay that way.


Final step, go sailing!

Tuesday, September 22, 2009

Hunting Island State Park continued

I did have my other camera with me so I managed to get a few more pictures the next day hiking around the island.


This was behind my camp and would get about a foot and a half deep at high tide.


Hey look, a deer. They were all over the camp and neighboring islands. Someone told me there were 12 deer altogether and the staff would move them around, but I'm not sure I buy that.


All in all, I had a fantastic weekend. It was supposed to rain the whole time, but I guess Fate decided to give me a break and the weather was perfect. Couldn't have asked for more.

Hunting Island State Park

Decided I needed some beach time, so got the weekend free. The original plan was to go to Charleston, but then started thinking about a state park near Beaufort, SC that I used to visit when I lived there. So I headed off to Hunting Island State Park. Got in around 8 or so and set up camp. I loved the spot I got, down a little trail and over a little rise which separated me from the rest of the campground. Here are a couple of pictures of my camp.


Those pictures are from the next morning, I set up camp in the dark. Which would not have been bad, except I had orginially planned on taking the motorcycle down and had packed everything there. I moved everything to the car since it was supposed to rain all weekend, but forgot to grab one thing from my motorcycle bag, my flashlights! Luckily I had a headlight for my bicycle with me so I was able to muddle through.

So I headed into town to grab dinner and got downtown around 9:15. Beaufort actually has a decent downtown these days but being a small town, every kitchen closed at 9pm! So I ended up eating at Outback, which is always decent food, but I really dislike eating at chain restaurants when I am traveling. Really, what's the point?

I thought about heading downtown, but while looking for food I had scouted around but really didn't see a crowd I wanted to hang out with (either too young or two old). So I figured I would head back out to Hunting Island and get some sleep, but on the way back I passed a little dive bar called Weezie's that looked like it was hopping so I turned around and pulled in. A decent bar band was having a CD release party, and it ended up being a lot of fun. They even had Sierra Nevada on tap! Couldn't have asked for anything more.

Got out kayaking the next morning when I finally woke up. Stopped off at a sand bar and got some decent pictures there and traveled up the lagoon.


Headed up the lagoon, I got a few more pictures but mostly just kicked back and enjoyed being out on the water.


The next two are of the biggest egret by far I had seen. You can see in the second picture how much bigger he was than the typical egrets.


Tragically, that was the end of the pictures using that camera. When I got back, there was an incident involving a dock, a strong tidal current, and a little stupidity on my part which meant I went swimming and my camera got a little wet. I blame it on my lack of sleep the night before.

The rest of the day was fairly uneventful, took a bike ride, a little nap, dinner at Steamers on Lady's Island and a quiet evening.

Monday, August 17, 2009

My Trip to the Dragon Pt 3

Apparently, I am not the first person to break my shift lever on the Dragon. Wheeler's Cycle back towards Robbinsville was just closing up as I got there right before 7pm Saturday night and had a new lever for me. Change it out and I back in business with the only casualties being my ego and a few scrapes on my boot from shifting without the peg.

Got up early and got a nice shot of the lake as I am headed back up. Really like the colors across the still water.


Made the Dragon without incident this time (passed like 6 bikes total at 8:30am) and got a picture of the dam.


The lake looks nice, but no swimming. The sign said so.


So heading up to the skyway there is a pretty red bridge, somehow I managed not to stare at it and run off the road.


Got a little foggy on the Skyway.


But what, me worry?


This has to be safe right? What could go wrong?


So after another run over the Dragon and back, I head home via 28, got a nice picture of the water station on the way home. Lots of great roads but decided to do more riding and less taking pictures.